Directions for use of Annotation editor for JavaSript based WYSIWYG editors
Table of contents:
Installing
- Download and install 4A server (follow the directions in Directions for use of 4A Annotation Server) - SEC API is not mandatory - default is to use our sec.fit.vutbr.cz
- Run the server.
- Clone GIT repository with client into web server directory (eg. /var/www/): http://knot.fit.vutbr.cz/annotations/aed/4Aclient2.git
- If you are not using it only on localhost, configure annotation server address in client (search for all occurences of localhost:8080).
- Optionally run make in the directory with client to get more example documents to annotate.
- Open index page in repository with client (eg. http://localhost/4Aclient2/) and observe annotation extension in TinyMCE.
Displaying of annotation editor GUI and connecting to the server
- To display annotation editor GUI you can click to extension button on the toolbar of your WYSIWYG editor.
- On the testing page editor is configured to connect automatically with default testing user name and password. If you have another one on the server, it is necessary to change index.php (if you will remove configuration for automatic authentication, client will ask for login and password).
- It can take some time to establish connection with the server (few seconds) and if there are zero or few annotations in the document, client will ask the server for annotation suggestions immediately which can take up to 1 or 2 minutes (according to length of the text, current SEC server load etc.).
- To hide the GUI, you can click to the button again.

Creation of an simple annotation
- Select range of annotated text by mouse.
- Click to Annotate button on annotation editor toolbar to display Edit Annotation window (window is not modal, so you can select annotated text or adjust selection later).
- Select type of annotation (described later).
- Optionally you can fill in textual content of annotation (eg. your note).
- Save annotation by Save button on the right bottom corner of the window.
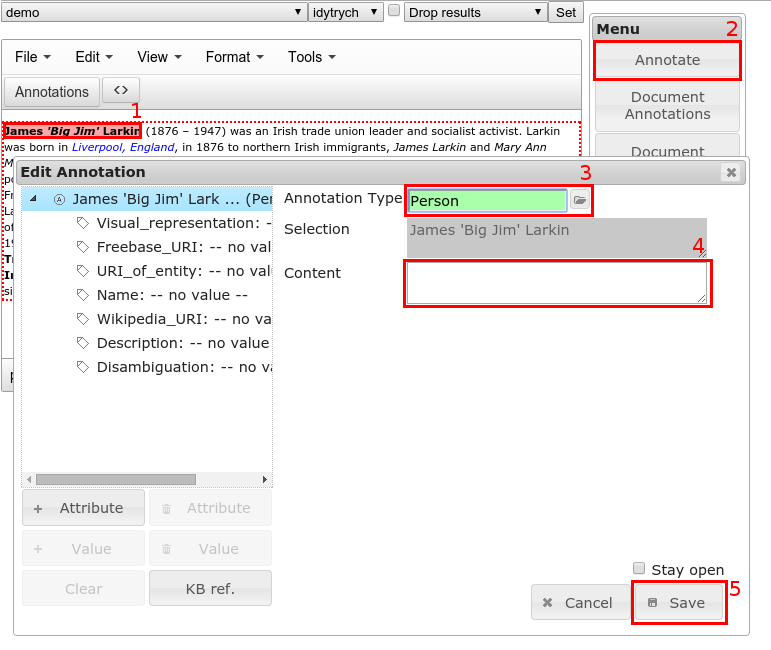
Selecting type of annotation
- Types of annotations are tags, which denoting meaning of annotated text. They are in the tree but multiple inheritance is allowed so one type can be on more places in the tree. In the Annotation Type field it is specified as a path in the tree (called linearized name in our documentations). Root of the tree is not visible for you, path starts on second level. Types in the path on individual levels on the tree are separated by arrow from dash and greater then sign "->". So example of type is "Person->Employee".
- Only alphabetical characters, numbers and some other characters as "-" (dash), "_" (underline) and "." (dot) are allowed in type name in actual version of system. If multiple words are necessary, they must be delimited by dot or underline, not by space character.
- you can select type of annotation by four methods:
- You can type name of new or existing type of annotation into Annotation Type field directly.
- If you starts writing to Annotation Type field, autocomplete functionality will be turned on automatically. So you can select offered type.
- On the right side from Annotation Type field it is Browse button. This button shows you the tree with types and you can select type from this tree. You can also enrich the tree in the showed window.
- You can combine first three methods described (eg. select type and then create subtype by writing to the Annotation Type field).
Structuring of annotations
- Annotations can be structured via attributes.
- Attributes are creating inner structure of annotation and can be used for creating structure from annotations simultaneously.
- Each attribute have name, attribute type and values. Values must be of attribute type or its subtype.
- Attribute can be added by "+ Attribute" button under the tree with attributes on the left side of Edit Annotation window (it can be used only if annotation or structured attribute value (also annotation) is selected). In the form for adding of attribute there are name of attribute (for names of attributes we have same rules as for names of types of annotations, but space character can be used) and area for selecting type of attribute. There are two roots of the tree with types. Under the first one there are simple types, under the second one are types of annotations (see below). Under the tree ther is autocomplete field for quick search. New types of annotations can be added in this dialogue too. On the bottom of dialogue there are checkboxes for setting if atttribute should be permanently added to the template of given type of annotation and whether should be value required.
- In the New Attribute window it is also possible to use button for selection of attribute from ontology. It will pre fill the fields in the underlying dialogue to use commonly used attribute name and type (if available) and connect the attribute to the ontology on the background.
- Type of existing attribute can be changed in field "Attribute Type", which have autocomplete or by using of dialogue displayed by button on the right of this field.
- There are two types of attributes:
- Attribute of simple type.
- Type of this attribute is one of supported simple data types:
- String can contain any string of characters.
- URI can contain any URI.
- DateTime can contain date and time.
- Date can contain date only.
- Time can contain time only.
- Integer can have value of integer number.
- Decimal can have value of decimal number.
- Boolean can have value true or false.
- GeoPoint have values of latitude and longitude, which points to any point in the globe.
- AnyAnnotation is a placeholder for some structured type (we know that there is a property but do not know value nor type).
- Duration can have value of duration (can be filled directly or computed from two dates).
- Text can contain any multiline long string of characters.
- Image can contain any URI of image.
- Entity can contain any entity from controlled vocabulary of SEC server (selected in autocomplete field).
- If it is possible to find value of attribute in the annotated text, it's not recommended way to copy it to the attribute value - it's better to use structured type of attribute (create annotation of it and use as value of attribute).
- Attribute of type of annotation (structured attribute)
- Type of this attribute is one of types of annotations and value is annotation or annotations of this type.
- There are two types of attributes of type of annotation:
- Nested annotation
- Nested annotation is annotation, which haven't meaning separated (eg. age have not meaning, if we don't know, whose age it is).
- Annotated text of nested annotation can be selected by mouse, if you have attribute (or attribute value if there is more values) selected in the tree.
- Nested annotation is created if checkbox "Nest Values" is checked for given attribure (it is not possible to have both nested and linked value in one attribute as it is evidently weird or wrong that one value can have meaning and one not).
- Textual content of nested annotation can be filled in and attributes can be assigned to this type of annotation too. For adding attribute to annotation in attribute select attribute with nested annotation (or particular attribute value if there is more values) and use "+ Attribute" button as on upper level.
- Annotations can be nested to teoretically unlimited number of levels.
- Annotation link
- Annotation link is link to the annotation.
- Linked annotation can have own content and attributes, but we can change it only if we are creating new linked annotation. If we are creating link to existing annotation now, we can't change attributes there. If we want to change them for existing annotation, we must edit appropriate annotation. It's countermeasure to make unwanted changes.
- If we have selected empty structured attribute or its new empty value in the tree, all annotations of type of attribute and its subtypes are blinking in the document. We can select one of them for the link by single click on the blinking annotated fragment (if there is more annotations on one fragment of text, there is second click needed to select appropriate one - flag icon should be used for it).
- We also can create new linked annotation directly in the process of creating our annotation (eg. we are annotating Person and we can create annotation of Date during it and use in attribute Date_of_birth). In this case we will select empty structured attribute or its new empty value in the tree and then simply select piece of text. Attributes of new annotation will appear and we can fill them in. This can be done recursively on attributes of new annotation so we can create chain of linked annotations this way.
- Any attribute can have more values. Value is added by clicking on "+ Value" button if attribute is selected in the tree. If attribute is of structured type, values can have different types (but they must be of type of attribute and its direct or indirect subtypes). Type of value can be changed in the field "Value Type".
- Value of attribute or whole attribute can be removed by appropriate button with trash bin. Value of attribute can be cleared by "Clear" button (all values with whole attribute selected). So if you will select wrong annotation for the link, you can click to appropriate attribute (or value if there is more values) in the tree, use "Clear" button and then select correct one.
- There is also special button "KB ref." which adds attribute named "KB_ref" of type Entity and removes all other nonempty attributes. It is quick way how to create annotation with link to the knowledge base (controlled vocabulary).
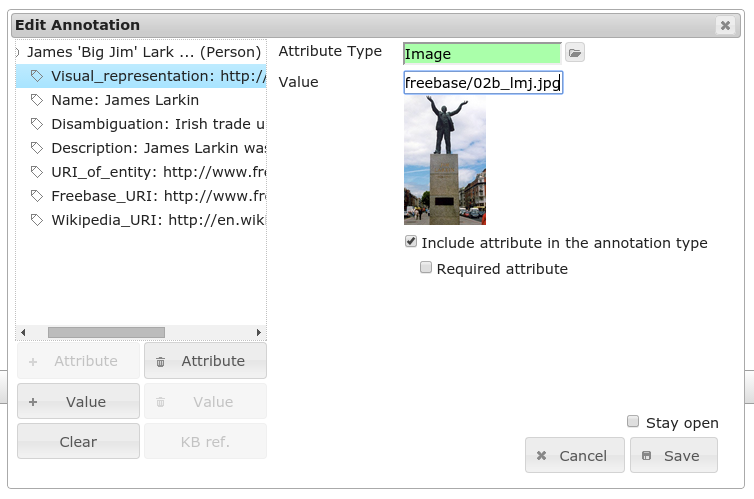
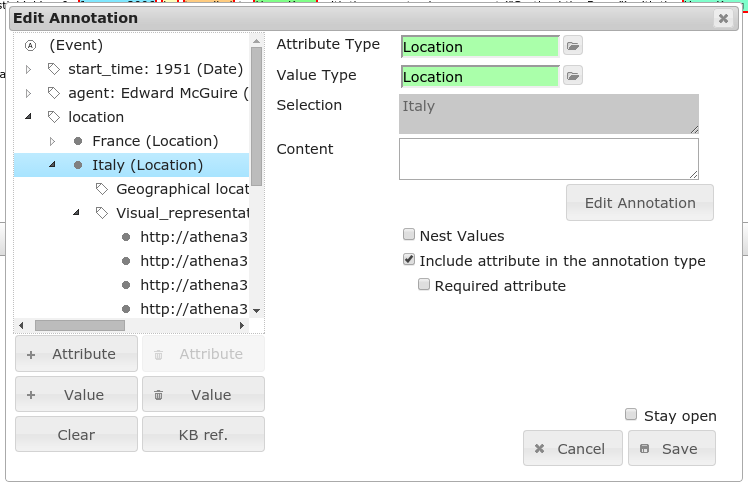
Templates for attributes
- Each type of annotation have one template with attributes assigned.
- If you select type of annotation, empty attributes for this type will be added to the list of attributes of newly created annotation.
- If you are creating annotation of some type, you can add attribute to its template. It's accomplished by checkbox in bottom of dialog for adding of attribute or by checkbox for filling in of attribute.
- If you would like force other users to fill in value of attribute, if they use this type of annotation, you can set attribute as required. It can be done by checking in checkbox under the checkbox for adding attribute to template.
- For existing attributes you can set, whether they are required, by checkboxes in the form for editing of the attribute. There can be set whether update type of existing attribute in the template too.
- If you will remove an attribute from annotation, annotation editor will ask you if you like to remove an attribute from annotation type (template).
Viewing of annotations
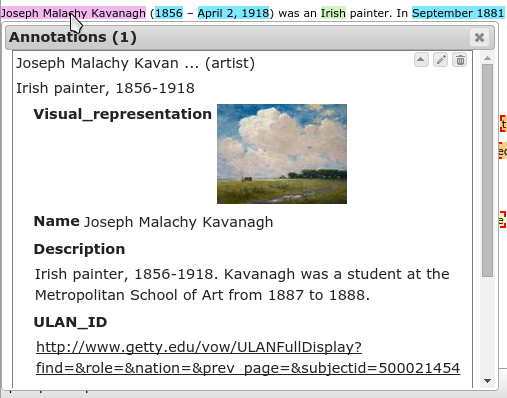
- Annotated fragments of text are highlighted and if you move your mouse cursor beyond fragment, small window with annotation will be displayed. Note: In Google Chrome it is possible that windows are not appearing. In this case it is necessary to click somewhere to text in TinyMCE. It is a feature of Google Chrome which can not be overcome.
- If you click to fragment by the left mouse button, window with annotation stay displayed, until you close it by button on the right upper corner of window or until you click to another annotated fragment in the annotated document.
- If attributes of the showed annotation are folded. You can unfold them by clicking to button with down arrow.
- If you click to icon "Open in a new window" for attribute of type of annotation in the annotation window, window of appropriate annotation will be displayed as if you click to it's fragment.
- If you click to "map" link in attribute of type GeoPoint, new tab with Google Maps will be opened and point will be showed on the map.
- On the right side of annotation window there are two buttons. Left button with pencil is used for editing of annotation. It will be filled back to form and you can edit it and save by same button as if you are saving new annotation. If you bethink, you can cancel editation by Cancel button on the right of button for saving of changes. Right button with trash bin is used to delete this annotation and all it's nested annotations.
Annotations of whole document
- You can create annotation of whole document by selecting of no fragments of text (click to any area of the document).
- Annotations of whole document are displayed in the window "Document Annotations", which can be displayed by menu button.
Settings
- For displaying of dialog with settings you can click to "Sesstings" button in menu.
- All the settings is saved on the server as list of parameters for each user.

Settings - Section Annotation types
- Appearance of annotation types (setting of colors of highlighting) - You can set color of annotated fragments of given type of annotation and its subtypes. You can select background color, font color, font weight etc. Color can be selected by color picker and alpha can be set in percents. If fragments can be overlapping, it is recommended to use background color and set alpha approximately in range of 20 - 80 (this way it will be visible and overlapping is clearly recognisable).
Settings - Section Suggestions
- If there is few (or no) annotations in the document, client requests them automatically after establishing connection to the server. In this section it is possible to set parameters of default request for suggestions. These can be later changed in the dialogue for suggestions (but it will be valid only to the end of session with given document).
- Default minimal suggestion confidence - Suggestion confidence is a number in percents. Every suggested annotation contains a value in percent reflecting the level of confidence that suggestion is right. If this value of any of suggested annotation is lower than choosen suggestion confidence, client will not receive this suggestion from the server.
- Default automatic suggestion confirming - If this feature is enabled, all suggestions with higher or equal confidence as chosen one are automatically confirmed and displayed as an annotations created by current user. User is then responsible for review and correction or removing of wrong ones. But if suggestions seems very good, it can be quicker than confirming one by one (but also less reliable as mistake can be easily overlooked).
- Default types - It is possible to display only suggestions of given types of annotations and their subtypes. There is possible to create a list of types to be used as default filter.
-
Settings - Section Annotation window
- In this section it is possible to set appearance of window with annotations which is displayed below fragment of text if mouse is moved over the fragment.
- Attributes of annotation (or suggestion) can be folded so only shortened annotated text, type of annotation and disambiguation attribute are visible. Other attributes can be unfolded or folded by click on appropriate icon. In this section of settings it is possible to set whether all attributes should be unfolded or folded by default. If attributes are unfolded, it is also possible to disable folding at all (hide the icon). Both can be set differently for suggestion and for annotation.
- Attributes of nested and linked annotations can be displayed directly in the parent or linking annotation. These attributes can be also folded separately so it is possible to set default state of folding for them.
- Level of displaying of nested or linked annotation inside the attributes of annotation can be set. Too deep level of nesting can create the window too high. Too small level can led to frequent need of clicking to see what is inside. So it is necessary to set it according to user needs.
- Displaying of nested or linked annotations with attributes can be unnecessary on lowest level. Eg. if there are annotations of dates etc. where annotated fragment and type can be enough for understanding to the annotation on upper level. So the attributes on the lower level can be hidden.
- Mode of displaying confidence can be set for suggestions.
- Maximum width and height of fragment window can be set to allow the user to see enough information without need of much scrolling or enlarging of window. Eg. URI can be long so if window can have unlimited width, user will need to scroll to right to access the icons. But if the user needs to always see the end of URI, can be valuable to set such width.
Settings - Section User
- Client Language - Language of user interface. For current version of client only English is available.
- Server Language - Language for warning and error messages, translation of suggested annotations etc. Current version of the server doesn't allow to set two translations for suggestions for the document (it is applied during their creation only - then they are cached). Values are from ISO 639-2 the alpha-3 Codes for the representation of names of languages, alternatives for bibliographic purposes and client have their user friendly representations. So if another translation will be added to the server, it is necessary to allow selection of given language in the clients file.
- Default User Group - If user is in more groups, there is possible to set in which group new types of annotations and annotations will be created.
Settings - Section Windows
- In this section it is possible to set default heights of some windows to allow the user to easily assemble his optimal user interface. In the future it will be saved from last session.
Settings - Section Advanced menu
- In this section it is possible to set which buttons will be displayed in advanced menu to allow simplify and clarify basic menu. If no buttons are displayed in advanced menu, whole advanced menu and button for its displaying will be hidden.
Settings - Section Other
- In the section "Other" you can set all settings which is not recognized by client. It can be settings related to some special server feature or module, other kinds of clients and so on. Each parameter of such settings have name, value and optional description. Start of name of parameter can be used to distinguish between settings for other clients and for the server. New parameter can be added with "Add" button under the parameters list. Modified list of settings is saved immediately after each change but for application of some server settings it may be required to disconnect and connect to the server again to establish new session (by button for enabling and disabling of the annotation editor).
Suggesting of annotations
- 4A server can suggest annotations to you, so you can only confirm or refuse suggestions. You can edit and save suggestion too.
- If there is few (or no) annotations in the document, client will request the suggestions automatically (with default settings). If suggestions are not requested automatically as there is more annotations in the document, you can request them using "Quick suggestions" button.
- It can take some time to create suggestions on the server (up to few minutes for long documents and heavy loaded server). Please be patient. If some problem will appear, it will be displayed in a Status Panel (window which will appear if it is currently hidden).
- For getting of suggestions with custom settings open the Suggest Annotations dialog from menu and select part of document to which suggestions should be get or click somewhere in the document for selecting the whole document (no fragments). You can select minimal confidence and types of annotations to be suggested too (if you don't do it, annotations of all types will be suggested). You can also enable automatic confirmation of suggestions (see abowe in section Settings). Now click to "Suggest Annotations" button and suggested annotations will appear between other annotations in the document, but it will be marked with dashed borders.
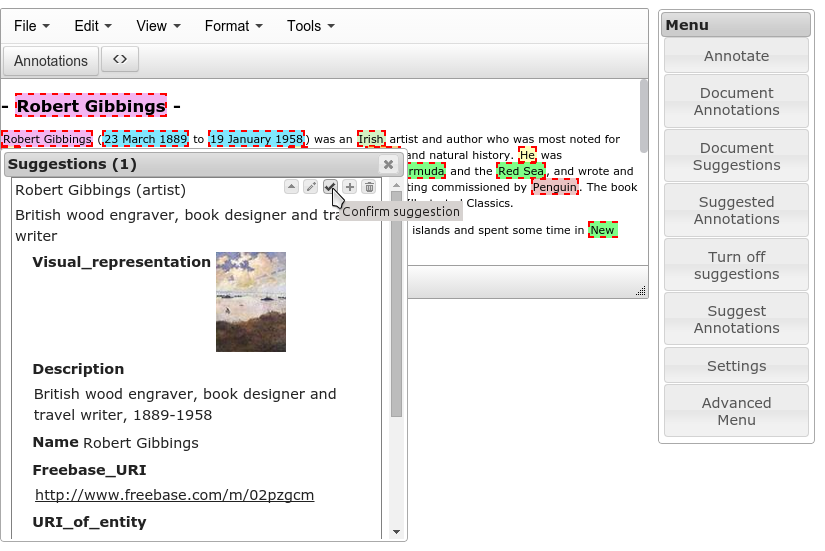
- Each suggested annotation have button with tick in its window, which can be used to confirm the suggested annotation. Icon with trash bin in suggested annotation window can be used to refuse the suggestion.
- If you want to change part of text to which suggestions are taken and displayed or type of suggested annotations, you can open Suggest Annotations dialog again, change parameters for suggesting and confirm with "Suggest Annotations" button.
- To disable suggesting of annotations and remove suggestions from document, you can simply use "Turn off suggestions" button. You can also open Suggest Annotations dialog and select empty part of text for suggesting (eg. one space). After you click to the "Suggest Annotations" button, your choice will be confirmed and suggestions dissapear.
- In the Suggested Annotations dialog you can see list of all suggestions, which are now suggested for selected part (or whole) document. If you will move by mouse over the suggestion in this dialog, it will be displayed also directly in the text below given fragment.
- Suggested annotations for the whole document will be displayed in dialog "Document Suggestions".
Alternative suggestions
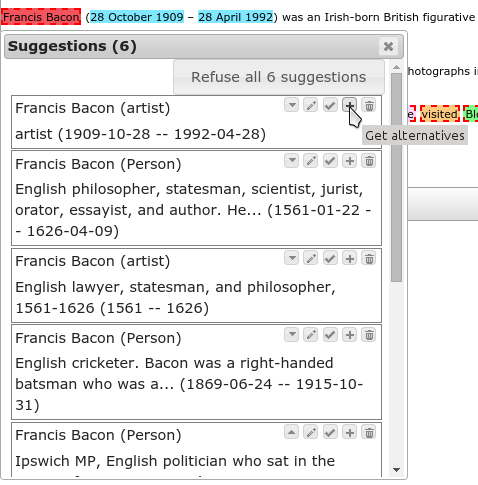
- For each suggestion alternatives can be requested. If you will use "+" button in the window with suggestion, client will request alternatives and server sends some of them (amount is depending on server settings and available alternatives).
- If you will refuse some suggestion and alternatives are available for it, they are immediately displayed.
- Creating of alternatives takes some time (there can be hundreds of them for all suggestions in the document) so if you will open new document, it is possible that alternatives will be working tens of seconds or few minutes (for long documents and heavy loaded server) after suggestions will appear.
- It is possible to set server to send some alternatives for all suggestions immediately after they will be created (see server documentation).
Users
- In Users dialog you can see all users of 4A server and their user groups.
User Groups
- In User Groups dialog you can see all user groups of 4A server and users in these groups.
- You can join the user group by clicking to "Not Joined" switch button beside the user group. To leave group you can use "Joined" switch button.
- Last user in Administrators group cannot leave this group. It's not possible to join to Administrators group in the client - it must be done by the user in this group on 4A server's web interface.
Subscriptions
- You can subscribe to annotation taking so client can take only annotations of selected types from selected sources.
- Subscriptions are defined as sets of filtering rules (sources) which will be applied if you will subscribe to them. In each rule there can be annotation type, user and/or user group specified. If rule is positive, it will select all annotations of given type and its subtypes from given (or all) user and group. If rule is negative, it will prevent to get specified annotations. Rules are sorted by specificity (more general rule is applied first). So you can select all artists and then exclude more specific type as sculptors.
- If you haven't set any subscriptions yet, after connecting to the server you are automatically subscribed to taking your own annotations and annotations from all yours groups.
- You can create new subscriptions or use subscriptions created by other users.
- If you will subscribe to more subscriptions, rules from all subscriptions will be combined and used.
Other features
- Status Panel shows operations performed (mostly communication with server) and errors and warnings which appeared.


